
Soups & Stews
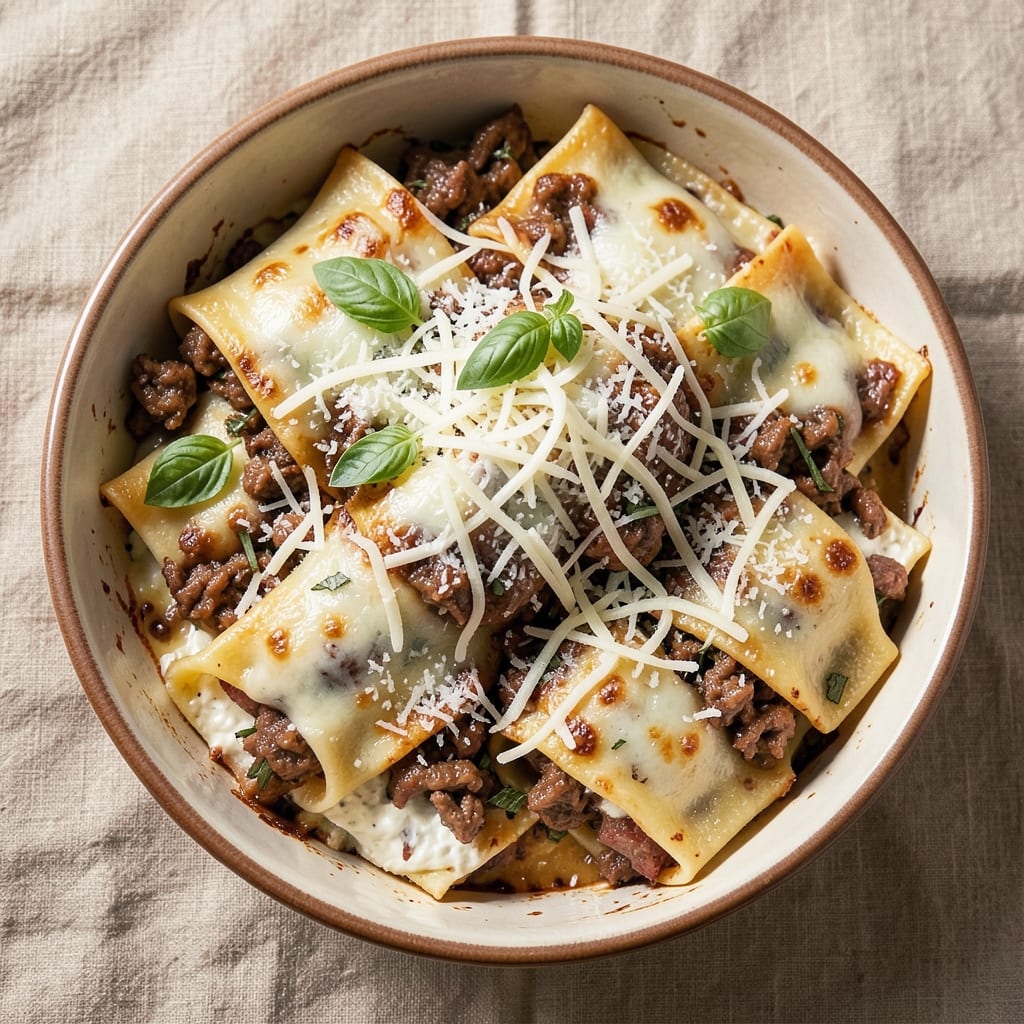
This beef and sausage manicotti recipe delivers restaurant-quality comfort food with rich, meaty layers and gooey cheese that melts perfectly every time. The secret lies in balancing tender ground beef, flavorful sausage, and a creamy ricotta filling that stays cohesive when baked. I've perfected this technique over years of testing, ensuring the pasta shells stay tender while the filling remains luscious and flavorful.
What sets this recipe apart is the foolproof assembly method that prevents leaks and creates those signature golden-brown twists. You'll start with a 30-minute prep time that includes browning the meat and mixing the filling, followed by a 45-minute bake at 375°F that transforms everything into a bubbling, cheesy masterpiece. The combination of Italian sausage and ground beef adds depth, while Parmesan and mozzarella create that irresistible stretchy texture.
By the time you pull this from the oven, you'll have a dish that looks as impressive as it tastes—layers of golden brown pasta peeking through creamy cheese, with meaty filling visible in perfect twists. The aroma alone will have everyone gathering around the table, and each bite delivers that perfect balance of savory meat, rich cheese, and tender pasta. This is comfort food at its finest, with just the right amount of effort to make it feel special.
Serve with a sprinkle of fresh basil and extra Parmesan for that final restaurant touch. The leftovers reheat beautifully too, making this an excellent meal for feeding a crowd or prepping ahead. Let's get started on creating your perfect manicotti.
Ingredients for beef and sausage manicotti
Six servings of restaurant-quality comfort that starts with these hearty, flavor-packed ingredients.
| Ingredient | Amount | Notes |
|---|---|---|
| Ground Beef 🥩 | 1 lb | 80% lean, finely ground |
| Italian Sausage 🌭 | ¾ lb | Sweet or spicy, casings removed |
| Whole Milk Ricotta Cheese 🧀 | 2 cups | Full-fat for creaminess |
| Large Eggs 🥚 | 2 whole | Room temperature for blending |
| Parmesan Cheese 🧀 | 1 ½ cups | Freshly grated from block |
| Mozzarella Cheese 🧀 | 2 cups | Low-moisture, shredded |
| Manicotti Pasta 🍝 | 12 pieces | Large, dried shells |
| Yellow Onion 🧅 | 1 whole | Medium size, finely diced |
| Garlic Cloves 🧄 | 4 cloves | Freshly minced |
| Extra-Virgin Olive Oil 🫒 | 2 tbsp | For browning meat |
| Tomato Paste 🍅 | ½ cup | Smooth, no sugar added |
| Dried Basil 🌿 | 1 tbsp | Or 0.25 cup fresh |
| Dried Oregano 🍃 | 1 tsp | Italian blend preferred |
| Ground Black Pepper 🌶️ | ½ tsp | Freshly cracked |
| Diamond Crystal Kosher Salt 🧂 | 1 tsp | For seasoning meat |
The meat combo is non-negotiable—ground beef for richness and Italian sausage for that herby kick. Grab the 80% lean beef for juiciness, and if you can't find sweet sausage, spicy works too. I always check the label for 'no fillers'—the Trader Joe's or Boar's Head brands are my go-to. For the ricotta, whole milk is key here (part-skim gets watery when baked). The Costco tub is a great deal if you're feeding a crowd, but any brand works as long as it's full-fat. Pre-grated Parmesan? Toss it—it's sawdust in comparison. Buy a wedge and grate it yourself, or grab the Penzeys pre-grated if you're in a hurry.
No ricotta? Cottage cheese blended until smooth gets you close, though it's not identical. Short on mozzarella? Provolone or fontina add different flavors but work in a pinch. The tomato paste can be from a squeeze tube if you're lazy—just measure it out. For the pasta, dried shells are a must (fresh cook too fast). Boil them just until al dente—they'll finish cooking in the oven. The filling mix should be thick but pipeable—if it's too loose, add a splash more ricotta. And trust me on the room temperature eggs. Cold ones make the filling grainy.
Prep the filling ahead and store it covered in the fridge for up to 24 hours—it actually tastes better the next day. The assembled manicotti keeps 3-4 days in the fridge, but I recommend freezing half for later. Wrap individual lasagna sheets in foil and freeze them flat—3 months no problem. When reheating, cover with foil for the first 20 minutes to prevent over-browning. Leftovers? Microwave with a splash of water for 30 seconds to revive the cheese. And save that extra Parmesan—it's perfect for topping before serving.
Why You'll Love This Recipe
- One-Pan Magic: I swear by this trick—brown the beef and sausage in the same pan you’ll later bake the manicotti in. Less cleanup, more flavor clinging to every bite.
- Meat-Lover’s Dream: That combo of ground beef and spicy Italian sausage? It’s what turns this into a hearty, satisfying dish. The ricotta keeps it creamy, but the meat makes it feel indulgent.
- Lunchbox Hero: Between us, this reheats beautifully. Pack leftovers for work or school—just a quick zap in the microwave, and it’s like you’re eating fresh. (Yes, even the kids will ask for seconds.)
- Budget Feast: Ground beef and sausage stretch far, and ricotta’s cheaper than you’d think. Add a sprinkle of Parmesan, and suddenly you’ve got a restaurant-worthy meal without the price tag.
Step-by-step instructions for beef and sausage manicotti
This method delivers restaurant-quality manicotti with perfectly balanced meaty filling and gooey cheese layers.
Prepare the Meat Filling
Heat the 2 tablespoons extra-virgin olive oil in a large skillet over medium-high heat. Add the 1 whole yellow onion and cook for 5 minutes until softened and translucent. Add the 1 lb ground beef and 0.75 lb Italian sausage, breaking them apart with a wooden spoon.
Season immediately with 1 teaspoon diamond crystal kosher salt and 0.5 teaspoon ground black pepper, then cook for 8-10 minutes until the meat is fully browned and any pink remains disappear. Stir in the 4 cloves minced garlic and cook for another 30 seconds until fragrant.
Remove from heat and stir in 0.5 cup tomato paste, 1 tablespoon dried basil, and 1 teaspoon dried oregano. Let the mixture cool for 10 minutes before mixing with the cheese filling—this prevents the ricotta from curdling when combined with warm meat.
Combine Cheese and Egg Mixture
In a large mixing bowl, combine the 2 cups whole milk ricotta cheese, 1.5 cups freshly grated parmesan cheese, 2 cups shredded mozzarella cheese, 2 whole large eggs, and 0.5 teaspoon ground black pepper. Mix with a wooden spoon until fully incorporated and smooth.
Gently fold in the cooled meat mixture using a spatula, being careful not to overmix. The filling should be thick but pipeable—if it's too stiff, add 1 tablespoon whole milk to loosen it. Cover and refrigerate for 30 minutes to firm up slightly before stuffing.
Boil and Stuff the Manicotti
Bring a large pot of salted water to a rolling boil and cook the 12 pieces manicotti pasta for 8-10 minutes until al dente but still tender. Drain immediately and transfer to a baking sheet to cool for 5 minutes. This prevents them from cracking when stuffed.
Transfer the filling to a piping bag fitted with a large round tip. Cut a small slit in each manicotti tube and gently pipe the filling into each one, being careful not to overfill. You'll need about 2 tablespoons of filling per tube—don't pack it too tightly or it won't cook evenly.
Assemble and Bake the Manicotti
Preheat your oven to 375°F. Spread 1 cup marinara sauce (homemade or store-bought) on the bottom of a 9x13-inch baking dish. Arrange the stuffed manicotti tubes seam-side down in the dish, leaving a ½-inch gap between each. Spoon the remaining sauce over the top, then sprinkle with an additional ½ cup shredded mozzarella cheese and ¼ cup grated parmesan cheese.
Bake uncovered for 35-40 minutes until the edges are golden brown and bubbly, and the cheese is fully melted and slightly browned on top. The internal temperature should reach 165°F when checked with an instant-read thermometer.
Rest and Serve
Remove from the oven and let the manicotti rest for 10 minutes before serving. This allows the filling to set slightly and makes slicing cleaner. Garnish with extra fresh basil leaves and a sprinkle of grated parmesan cheese if desired.
Each bite should deliver a perfect balance of savory meat filling, rich cheese, and tangy tomato sauce. Serve with a side of garlic bread to soak up any extra sauce—this dish is even better the next day when the flavors meld together!
Pro Tips For Making Beef And Sausage Manicotti
- Brown the Meat First: Drain the sausage casings and crumble the meat before cooking—this guarantees even browning. I learned this the hard way: skipping this step leaves you with pale, bland filling that won’t hold up in the oven. Use a 12-inch skillet on medium-high heat and break the meat into ½-inch pieces for maximum surface area.
- Drain Ricotta Like a Pro: Spread whole-milk ricotta on a paper towel and let it sit for 10 minutes before mixing. This removes excess moisture without drying it out—trust me, soggy manicotti shells are a nightmare to salvage. (Yes, even if you’re impatient like me.)
- Pre-Bake the Shells: Toss uncooked manicotti shells in warm marinara sauce for 5 minutes before assembling. This softens them slightly so they don’t crack when you roll them, and it keeps the filling from leaking like a sieve. Works for both dried and fresh shells.
- Egg the Filling Right: Whisk the egg into the ricotta mixture last, then fold gently with a spatula—don’t overmix. The goal is to bind without making it dense. I was skeptical until I tried it: the texture stays light and creamy, not gluey. (Your future self will thank you.)
Make-ahead tips for this recipe
Filling Prep Ahead
Mix your meat and cheese filling the night before—it actually tastes better after flavors meld. Store it in an airtight container in the fridge for up to 24 hours. The ricotta will firm up slightly, making it easier to pipe into shells later. I like to cover it tightly with plastic wrap pressed directly on the surface to prevent drying. 🧀
Assembled Manicotti Storage
Assembled (but unbaked) manicotti keeps well in the fridge for 3-4 days when wrapped tightly in plastic wrap. For longer storage, freeze individual portions wrapped in foil for up to 3 months. Thaw overnight in the fridge before baking—never microwave frozen manicotti directly.
Baking from Frozen
If you're short on time, bake from frozen! Cover the assembled dish with foil and bake at 375°F for 50 minutes (instead of 40). Then remove foil and bake 10-15 more minutes until bubbly. The center should reach 165°F—use an instant-read thermometer to check. The extra time ensures even cooking through the frozen filling. ❄️
Reheating Leftovers
Leftovers reheat beautifully in the oven or microwave. For oven reheating, cover with foil and bake at 350°F for 15-20 minutes until heated through. For microwave reheating, cover with a damp paper towel and heat in 30-second intervals, stirring between each, until fully warm. Add a splash of water or milk to revive the cheese if it looks dry. 🔥
Make-Ahead Baking
For ultimate convenience, assemble and bake your manicotti a day ahead. Let it cool completely, then refrigerate covered. Reheat at 350°F for 20-25 minutes before serving. The flavors deepen overnight, and the dish reheats perfectly—ideal for potlucks or busy weeknights. The cheese stays gooey, and the pasta remains tender. 📅
Nutrition facts
Frequently asked questions
Can I substitute regular lasagna noodles for manicotti shells?
No, manicotti shells are specifically designed to hold filling—regular lasagna noodles are too thin and will crack when stuffed. If you're in a pinch, try giant ravioli shells (like jumbo tortellini) as a substitute, but the texture won't be identical. The 12-piece dried manicotti shells in this recipe are the best choice for that signature twist and sturdy structure.
How do I prevent leaks when stuffing the manicotti?
First, make sure your filling is thick but pipeable—not too loose or it'll ooze out. Chill the filling for 30 minutes before stuffing, and don't overfill the shells (about 2 tablespoons per tube). Also, boil the shells just until al dente—they'll finish cooking in the oven, and being slightly firm helps them hold the filling better.
What's the best way to make this vegetarian?
Swap the beef and sausage for 15 oz mushrooms (finely chopped and sautéed) and 1 cup cooked lentils or crumbled tofu for protein. Add 1 teaspoon smoked paprika for depth, and use vegan mozzarella (like Miyoko's) to keep it melty. The ricotta can be replaced with cashew ricotta for a neutral flavor.
Can I use fresh manicotti shells instead of dried?
Fresh shells cook much faster—boil them for only 3-4 minutes (they'll finish in the oven). However, they're trickier to stuff because they soften quickly. If using fresh, work fast and let them cool for just 2 minutes before piping. Dried shells are more forgiving for beginners.
Why did my manicotti turn out dry?
Overbaking is the most common cause—check the internal temp at 165°F with a thermometer. Another culprit? Not enough sauce or cheese. Try adding ½ cup heavy cream to the filling or brushing the shells with marinara before assembling. Always cover with foil for the first 20 minutes of baking to trap moisture.