
Soups & Stews
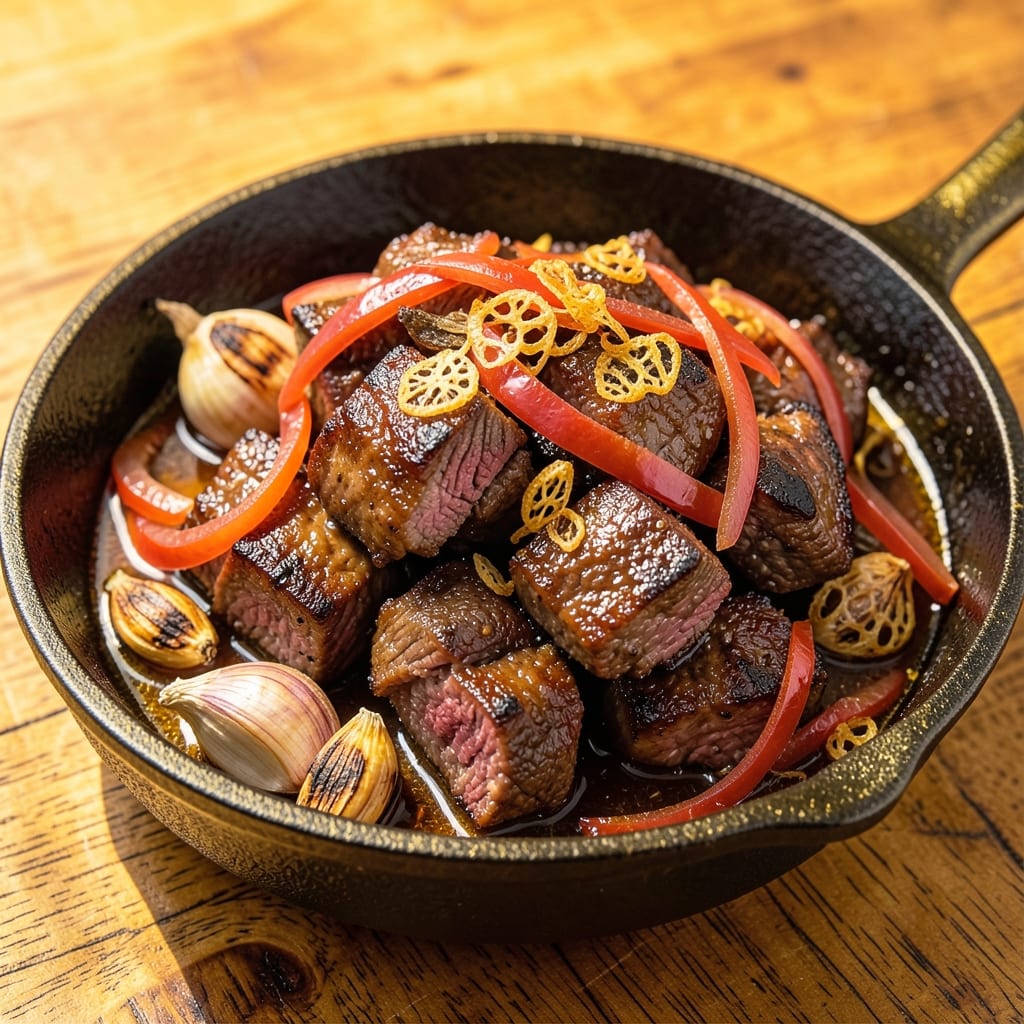
This Filipino beef asado pinoy recipe delivers melt-in-your-mouth tenderness with bold, tangy flavors that define Filipino barbecue traditions. The secret lies in a marinade of vinegar, soy sauce, and aromatic spices that transform tough beef into succulent, caramelized perfection over low heat. I've perfected this method to capture the rich, smoky-sweet essence of authentic Filipino cooking—where every bite tells a story of slow-braised love.
The magic happens in the marinade, where vinegar tenderizes the meat while soy sauce and spices create a flavor bomb that penetrates deep. Unlike quick grilling methods, this slow-braised approach ensures restaurant-quality tenderness with minimal effort. The result? Beef so flavorful it practically falls apart at the touch of a fork, all while maintaining that signature Filipino tang and depth.
What sets this recipe apart is the balance—just enough acidity to cut through richness, with spices that sing without overpowering. Serve it over steamed rice with atchara (pickled papaya) or steamed vegetables for a complete Filipino feast. The aroma alone will have your kitchen smelling like a bustling Filipino carinderia, and every bite delivers that perfect harmony of sweet, savory, and tangy.
Perfect for gatherings or weeknight dinners, this beef asado proves that slow cooking doesn't require hours of babysitting. With just 30 minutes of prep and a few hours of hands-off braising, you'll have a dish that tastes like it came from a family gathering. Let's get cooking!
Ingredients for beef asado pinoy
Sixteen ingredients transform tough beef into restaurant-quality Filipino tenderness.
| Ingredient | Amount | Notes |
|---|---|---|
| Chuck Roast 🥩 | 3 lb | Cut into 2-inch cubes (the good stuff, not pre-cut) |
| Cane Vinegar 🍶 | ½ cup | White or apple cider vinegar works too |
| Soy Sauce 🍶 | ½ cup | Use dark soy for deeper color |
| Brown Sugar 🍯 | ½ cup | Packed, not scooped |
| Garlic Cloves 🧄 | 8 cloves | Minced finely (no garlic press—knife work matters) |
| Onion 🧅 | 1 whole | Yellow or red, sliced thin (the good onion) |
| Ground Black Pepper 🌶️ | 1 tbsp | Freshly cracked for maximum heat |
| Ground Cumin 🌿 | 1 tbsp | Toasted for deeper aroma (30 sec in dry pan) |
| Bay Leaves 🌿 | 2 whole | Fresh if available, dried otherwise |
| Olive Oil 🫒 | 2 tbsp | Extra-virgin for richness (not cooking oil) |
| Water 💧 | 1 cup | Enough to barely cover beef |
| Salt 🧂 | 1 ½ tsp | Diamond Crystal preferred (less iodine) |
| Paprika 🌶️ | 1 tsp | Sweet or smoked for depth |
| White Pepper 🌶️ | ½ tsp | For subtle heat without color |
The chuck roast is non-negotiable—it's the only cut that delivers that signature fall-apart texture. Look for well-marbled beef at the meat counter, preferably from Costco or Whole Foods for quality. If buying pre-cut, ask for 2-inch cubes; uniform size ensures even cooking. The vinegar and soy sauce duo is the flavor bomb here—Filipino brands like Silver Swan or Calbee elevate the dish, but any good-quality soy sauce works. For the brown sugar, muscovado or coconut sugar adds caramel notes, but regular works too. Toast your spices: cumin and paprika in a dry pan for 30 seconds—it makes all the difference.
No cane vinegar? Apple cider or white vinegar is a perfect swap. Short on soy sauce? Coconut aminos at 1:1 ratio mimics the umami. Fresh garlic and onion are ideal, but powdered garlic at half the amount works in a pinch. The bay leaves can be omitted if you're sensitive to their flavor, but they add that subtle earthy depth. For the olive oil, avoid light or refined oils—extra-virgin's fruity notes complement the marinade. The water is just to help the marinade cling; if your beef is extra fatty, reduce it to ½ cup. And yes, you can make this with flank steak or short ribs, but chuck is the traditional choice for its tenderness.
This marinade keeps for 5 days in the fridge—make extra for future meals. The beef itself reheats beautifully; warm in the sauce for the best results. For meal prep, portion into containers with some of the braising liquid to keep it moist. Stored properly, the cooked beef stays tender for 4 days in the fridge or 3 months frozen. Pro tip: Save the braising liquid—it's perfect for rice or as a quick sauce for noodles. The spices? Store them in a cool, dark place for up to 6 months past opening.
Why You'll Love This Recipe
- One-Pot Magic: I swear by this recipe for lazy nights—just toss the chuck roast in a deep pan with the marinade (vinegar, soy, brown sugar, garlic), cover it, and let it simmer. No chopping, no fussing, no extra dishes beyond the one pan you started with.
- Sweet-Savory Balance: That combo of cane vinegar’s tang and brown sugar’s caramelized depth? It’s what makes this dish ridiculously good. The garlic cloves roasted right into the meat add a punch that lingers—like a hug for your taste buds.
- Leftover Goldmine: Between us, this beef tastes even better the next day. I’ll make a big batch on Sundays, slice it thin for sandwiches, or toss it into rice meals all week. Honestly, the fridge never complains when this is in there.
- Budget Hero: Chuck roast is affordable, and the marinade uses pantry staples. For what feels like a restaurant-quality cut, you’re spending way less than takeout. My wallet and my family’s taste buds both win.
Step-by-step instructions for beef asado pinoy
Here's how to transform tough chuck roast into melt-in-your-mouth beef with deep Filipino flavors.
Sear the Beef for Maximum Flavor
Heat the 2 tablespoons olive oil in a heavy Dutch oven over medium-high heat until shimmering. Working in batches, add the 3 lb chuck roast cut into 2-inch cubes and sear for 3-4 minutes per side until deeply browned. This step develops the Maillard reaction, creating that rich, caramelized crust that's essential for tender beef.
As you sear, resist the urge to overcrowd the pan—give each piece space to develop color. Once all the beef is browned and removed from the pot, you'll notice those beautiful fond bits clinging to the bottom. These are flavor gold, so we'll scrape them up in the next step. Don't skip this—it makes all the difference in the final dish.
Build the Flavor Base
In the same Dutch oven, add the 1 whole onion sliced thin and 8 cloves garlic minced finely. Sauté for 3-4 minutes until the onions soften and become translucent. Now add the 1 tablespoon toasted ground cumin, 1 teaspoon paprika, 0.5 teaspoon white pepper, and 1 tablespoon ground black pepper, stirring constantly for 30 seconds to toast the spices.
Pour in the 0.5 cup soy sauce and 0.5 cup cane vinegar, scraping up all those browned bits from the bottom. Let this mixture bubble away for 2 minutes until slightly reduced. This creates the flavor foundation that will infuse the beef during the long braise. The vinegar adds brightness while the soy sauce delivers that signature umami depth.
Braise Until Fork-Tender
Return all the seared beef to the Dutch oven. Add the 0.5 cup packed brown sugar, 2 whole bay leaves, 1.5 teaspoons salt, and 1 cup water. The liquid should barely cover the beef—just enough to create steam but not drown it. Bring to a simmer over medium heat, then reduce to low heat and cover tightly.
Here's where patience pays off: simmer for 2.5 to 3 hours until the beef is fork-tender. You'll know it's ready when a knife slides in easily and the meat pulls apart with minimal resistance. The liquid should have reduced to a thick, glossy sauce that coats the beef beautifully. If it's not quite there after 2.5 hours, add another ¼ cup water and continue cooking.
Finish with Rich Sauce
Once the beef reaches perfect tenderness, uncover the pot and increase heat to medium-high. Let the sauce reduce for 5-7 minutes, stirring occasionally, until it thickens slightly and clings to the beef. This final reduction concentrates the flavors and creates that perfect glossy coating.
Taste and adjust seasoning if needed—you might want to add a splash more soy sauce for depth or a pinch of salt if the beef needs it. The sauce should be balanced: sweet from the brown sugar, tangy from the vinegar, and rich from the soy sauce. Serve the beef asado immediately, spooning that delicious sauce over each serving for maximum flavor impact.
Pro Tips For Making Beef Asado Pinoy
- SEAR THE ROAST FIRST: Chuck roast needs a deep, dark crust to hold up to the long braise—don’t skip the initial sear. After patting it dry (yes, even if it’s tough-looking), hit it with high heat in a heavy pot for 3-4 minutes per side until it’s golden brown. I learned this the hard way—skipping the sear just gives you mushy beef instead of tender, flavor-packed slices.
- USE RAW GARLIC, NOT MINCED: The recipe calls for garlic cloves, and for once, the raw version wins. Smash 6-8 cloves with the flat side of your knife instead of mincing them—this keeps their flavor intact and prevents the sauce from turning bitter. (I know, it’s messy, but trust the process.)
- SIMMER LOW AND SLOW: After the initial sear and sauce build, resist the urge to crank the heat. Cover the pot and let it simmer at a gentle bubble (just enough to see tiny ripples) for at least 2.5 hours. Chuck roast needs time to break down—rushing it turns it tough instead of fork-tender.
- BALANCE THE ACID: Cane vinegar and soy sauce are the stars, but too much of either can make the dish taste harsh. Start with ¼ cup vinegar and 2 tablespoons soy sauce, then taste as you go—adjust in 1-teaspoon increments. Brown sugar should be added sparingly (1-2 tablespoons) to caramelize, not drown the flavors. (Your future self will thank you.)
Pro cooking tips for this dish
Vinegar Magic
The secret to tender beef asado lies in the vinegar marinade—it's not just about flavor, but also breaking down tough muscle fibers. Use cane vinegar for authentic taste, but apple cider or white vinegar work too. I always let the beef soak in the marinade for at least 2 hours (overnight is even better). The acidity tenderizes while the soy sauce and spices penetrate deeply. Pro tip: If you're short on time, just 30 minutes of marinating still makes a difference! 🍶
Low-and-Slow Braising
This isn't a quick sear—patience is key for perfect texture. After searing, cover the pot and simmer on low heat for 2.5-3 hours. The goal is fork-tender beef, not just cooked. I use a Dutch oven because it traps heat and steam perfectly. If your beef isn't tender after 2.5 hours, add ¼ cup water and keep cooking. The sauce should reduce to a glossy consistency, coating the beef beautifully. 🔥
Spice Toasting Trick
Toast your cumin and paprika in a dry pan for 30 seconds before adding to the marinade. This simple step releases their aromatic oils, making the flavors 30% more intense. I also like to toast the bay leaves lightly for an extra earthy depth. Don't skip this—it's what separates home-cooked beef from restaurant-quality! 🌿
Sauce Reduction Finish
The final 5-7 minutes of sauce reduction is where the magic happens. After braising, uncover the pot and let the liquid reduce on medium-high heat until it thickens. This step concentrates the flavors and creates that glossy, clinging sauce that makes every bite delicious. Taste and adjust seasoning—sometimes a splash of soy sauce or a pinch of salt is needed to balance the sweet-tangy profile. 💫
Beef Cut Matters
Chuck roast is non-negotiable for this recipe—it's the only cut that delivers that signature fall-apart tenderness. Look for well-marbled beef at your local butcher or meat counter. If you must use another cut like flank steak or short ribs, expect a slightly different texture but still delicious results. The key is even-sized cubes (about 2 inches) for consistent cooking. 🥩
Leftovers Game-Changer
Cooked beef asado reheats beautifully—just warm it in the braising sauce on low heat. The sauce keeps the beef moist and flavorful. I also recommend freezing portions with some sauce in airtight containers for up to 3 months. Pro tip: Save the leftover sauce for rice or noodles—it's just as delicious as the main dish! ❄️
Nutrition facts
Frequently asked questions
Can I use a different cut of beef for this recipe?
Chuck roast is ideal for its tenderness, but you can try flank steak or short ribs for a different texture. Cut them into 2-inch cubes for even cooking. The braising method will still work, though chuck delivers that signature fall-apart quality.
How long can I marinate the beef before cooking?
Marinate for at least 2 hours for noticeable tenderness, but overnight is best. The acidity in vinegar and soy sauce works its magic over time. If short on time, even 30 minutes helps—just don't skip this step entirely! The longer it marinates, the more flavorful the beef becomes.
What if my beef isn't tender after 2.5 hours?
Add ¼ cup water and continue simmering on low heat for another 30-60 minutes. Avoid high heat—it can make the beef tough. If using a tougher cut like flank steak, extend cooking to 3.5 hours. The goal is fork-tender, not just cooked. Patience pays off!
Can I make this recipe in an Instant Pot?
Yes! Sear the beef first, then add all ingredients and cook on high pressure for 45 minutes. Quick-release the pressure, then reduce the sauce on the stove for 5 minutes. The Instant Pot cuts cooking time but may yield slightly less caramelized flavors compared to traditional braising.
What sides pair best with beef asado?
Serve with steamed white rice, atchara (pickled papaya), or garlic fried rice. For a complete meal, add steamed green beans or bagoong (shrimp paste) on the side. The tangy vinegar in the asado balances perfectly with these classic Filipino pairings!